 By
By Earlier in the year we migrated from a dedicated server hosting facility to AWS, and we're very glad we did. We're happy to have a bunch of automation in place, as we get to spend less time fiddling with servers that way. :) This post describes what happens in our infrastructure when we have changes in the volume of error notifications that we are processing.
How We Scale
Our processing pipeline relies heavily on Sidekiq, which has been rock-solid for us. The majority of the work in the pipeline is handled by instances that belong to an autoscaling group. When the Sidekiq backlog increases, a CloudWatch alarm triggers, causing new instances to be started in this group. As the traffic subsides and the backlog disappears, instances are terminated.
How We Scale, With Style
The only snag in this setup is that we'd like to make sure the Sidekiq workers finish doing all of their work before an instance gets terminated. Even though Sidekiq supports rescheduling jobs that get terminated before completion, we prefer to avoid that when we can — it's better to take a few extra seconds to finish a job than to have it rescheduled and restarted. Fortunately, in its awesomeness, Sidekiq has a method for telling worker processes to stop accepting new work after the current job is completed, making it easy to drain workers in preparation for termination. The trick is letting those workers know that they need start draining — and for that, we use a combination of Lifecycle Hooks, CloudWatch Events + Lambda, EC2 Simple Systems Manager, and a wee bit of code.
The rest of this post will show you how you can copy our setup to get instances that go gently into that good night.
Prerequisites
Naturally, you'll need an autoscaling group that has a scaling policy that terminates instances based on some rule you define. In addition to that, you'll need to have your instances configured to run the SSM Agent and running in a role that has SSM access. These instances will also need to have permissions to interact with the autoscaling API. Here's a policy document for the instance role:
The Code
Once those items are in place, you can start connecting the pieces together. We'll start at the end of the process — our scripts that will live on the instance and handle Sidekiq draining — and we'll work our way backwards. First, the Ruby code that will quiet the workers and wait for them to finish working:
We get a list of Sidekiq processes that are running on the current instance via the Sidekiq API, tell them to stop accepting new work, then wait until all the processes have no active jobs.
Here is the shell script that will trigger that script when it's time to terminate the instance:
There's a lot of setup to do, but the meat of this script starts at line 8. First we signal to the autoscaling group that we are working on the lifecycle hook. This has the side-effect of being a guard — if this instance hasn't been scheduled for termination by the autoscaling group, then this command will fail, and the worker shutdown script won't be invoked. This script shouldn't be called unless the instance has been scheduled for termination, but it doesn't hurt to be a little defensive. :) Assuming we are moving forward, we shut down the workers, and then we tell the autoscaling group to go ahead with the termination. If we don't make that API call, then the instance will remain running until the expiration of the hook's timeout (we'll get to that in a bit).
The SSM Document
Now we need something that will trigger this shell script. That's where the SSM agent comes in. It's happily running in the background, waiting for a Document to show up via SendCommand to tell it what to do. Our Document instructs the agent to run the termination script:
You can create your Document by clicking the Documents link in the Systems Manager Shared Resources section of the EC2 console (near the bottom of the sidebar), clicking the Create Document button, and dropping that JSON into the Content box.
The Lambda Function
With your Document in place, create a Lambda function that will run it on the target instance when it's time to terminate an instance. Here's some code for that:
You will need to replace PrepInstanceForTermination with whatever
name you chose for your Document, but otherwise this code is just
copy-and-paste.
This Lambda function needs a couple of permissions (in addition to the usual Lambda permissions), and here's an IAM policy document for that:
Again, you may need to replace the Document name.
The Hook and the Event Rule
Hang in there — we're almost there! You have two things left do: create the Cloudwatch Event and the Lifecycle Hook. First, the Event:
In the CloudWatch management console, click Events in the sidebar, and then click the Create rule button. This is what will trigger the Lambda function you just created.
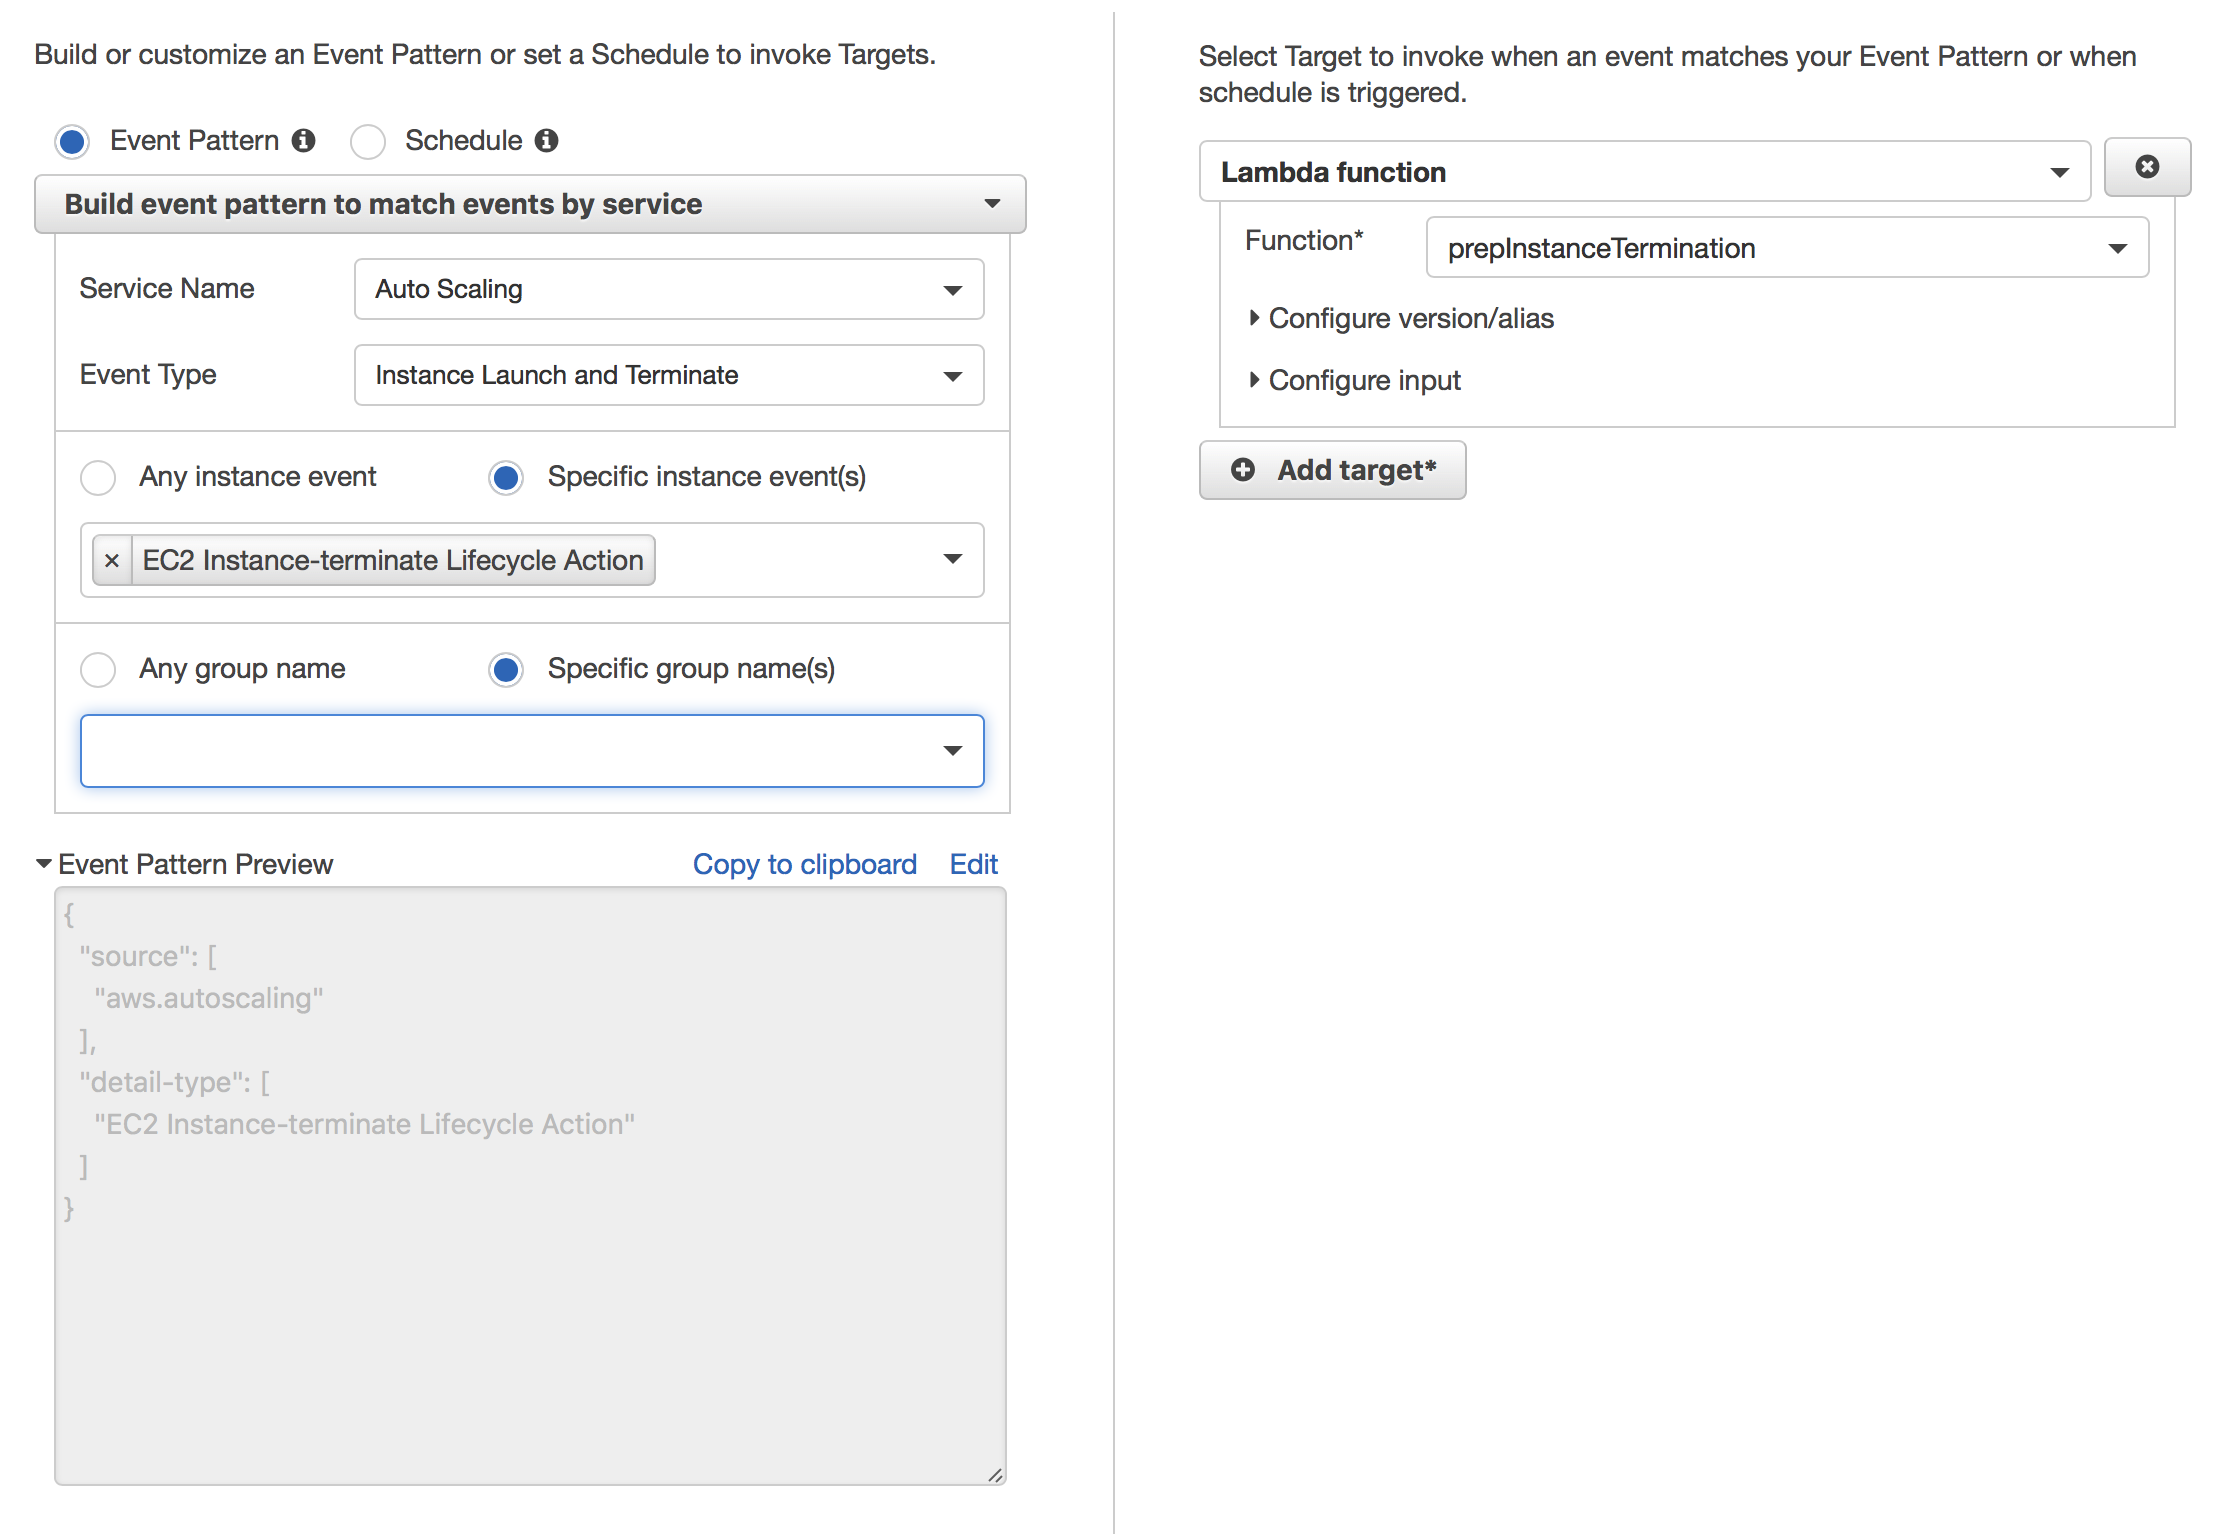
On the left you pick the event you want to watch and any additional characteristics about that event (like limiting which autoscaling groups will trigger this event), and on the right you pick the target of the rule — in our case, the Lambda function we created earlier. You don't need to change any of the defaults for the Lambda function target.
Once that's done, head back to the EC2 management console and navigate to the autoscaling group that has the instances you want to manage. After clicking on the Lifecycle Hooks tab, you'll be able create a hook. Ours looks like this:
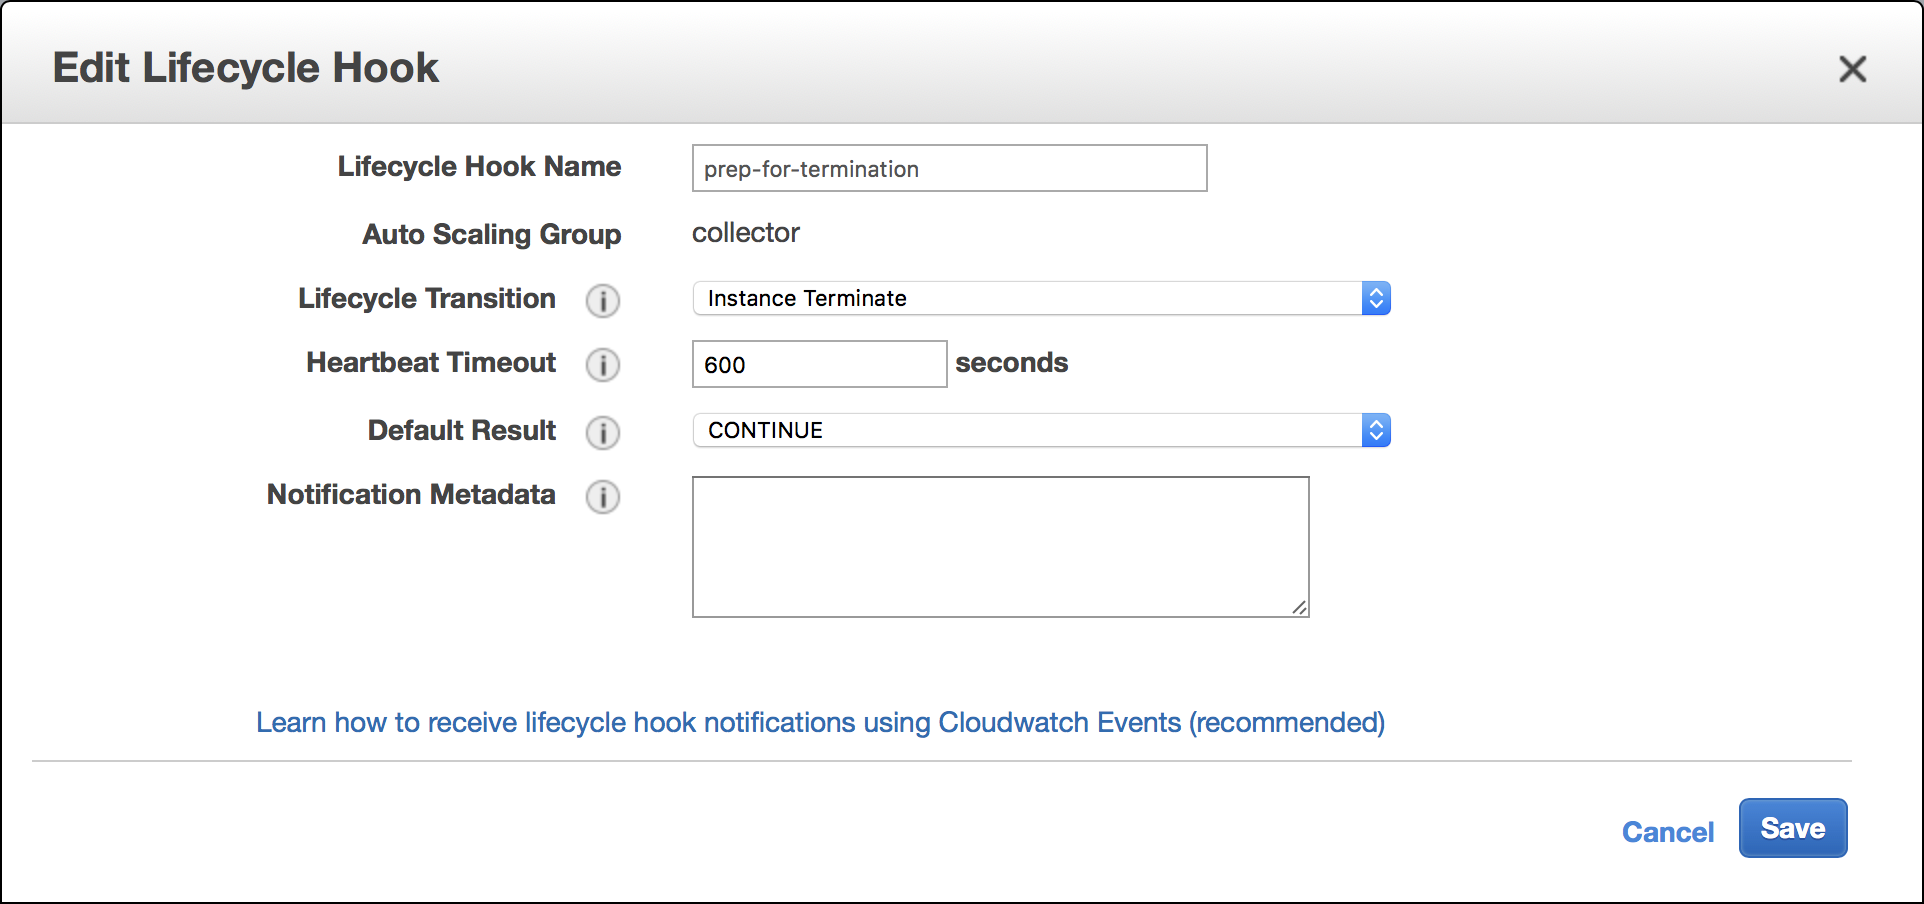
Terminate is the transition we're interested in, and we'd like the termination to go ahead (Default Result: CONTINUE) if for some reason the API call doesn't happen in our shell script after 600 seconds (Heartbeat Timeout) have elapsed. This will result in our instances being terminated one way or another, even if the Sidekiq workers aren't done, after 10 minutes.
That's a Wrap
You made it! You now have an autoscaling group that can terminate its Sidekiq instances in a humane way. Enjoy!
P.S.: Credit goes to awslabs for a super-helpful tutorial on putting some of these pieces together.


 Molly Struve, Sr. Site Reliability Engineer, Netflix
