 By
By Websockets are getting more and more press these days. We hear that they're "the future." We hear that they're easier to use than ever thanks to ActionCable in Rails 5. But what exactly ARE websockets? How do they work?
In this post we're going to answer these questions by building a simple WebSocket server from scratch in Ruby. When we're done we'll have achieved bi-directional communication between a browser and our server.
The code in this post is meant as a learning exercise. If you want to implement websockets in a real production app, check out the excellent websocket-ruby gem. You might also take a look at the WebSocket Spec.
So you've never heard of websockets
Web sockets were invented to solve some problems inherent in normal HTTP connections. When you request a webpage using a normal HTTP connection, the server sends you the content and then closes the connection. If you want to request another page, you have to make another connection. This normally works fine, but it's not the best approach for some use cases:
- For some applications, like chat, the front end needs to be updated as soon as a new message comes in. If all you have is normal HTTP requests, that means that you have to continuously poll the server to see if there is new content.
- If your front-end application needs to make lots of small request to the server, the overhead of creating new connections for each request can become a performance issue. This is less of a problem in HTTP2.
With Web sockets, you make one connection to the server which is then held open and used for bidirectional communication.
Client side
Web sockets are normally used for communication between a browser and a Web server. The browser side is implemented in JavaScript. In the example below I've written a very simple piece of JavaScript to open a Web socket to my local server and send a message to it.
<!doctype html>
<html lang="en">
<head>
  <title>Websocket Client</title>
</head>
<body>
  <script>
    var exampleSocket = new WebSocket("ws://localhost:2345");
    exampleSocket.onopen = function (event) {
      exampleSocket.send("Can you hear me?");
    };
    exampleSocket.onmessage = function (event) {
      console.log(event.data);
    }
  </script>
</body>
</html>
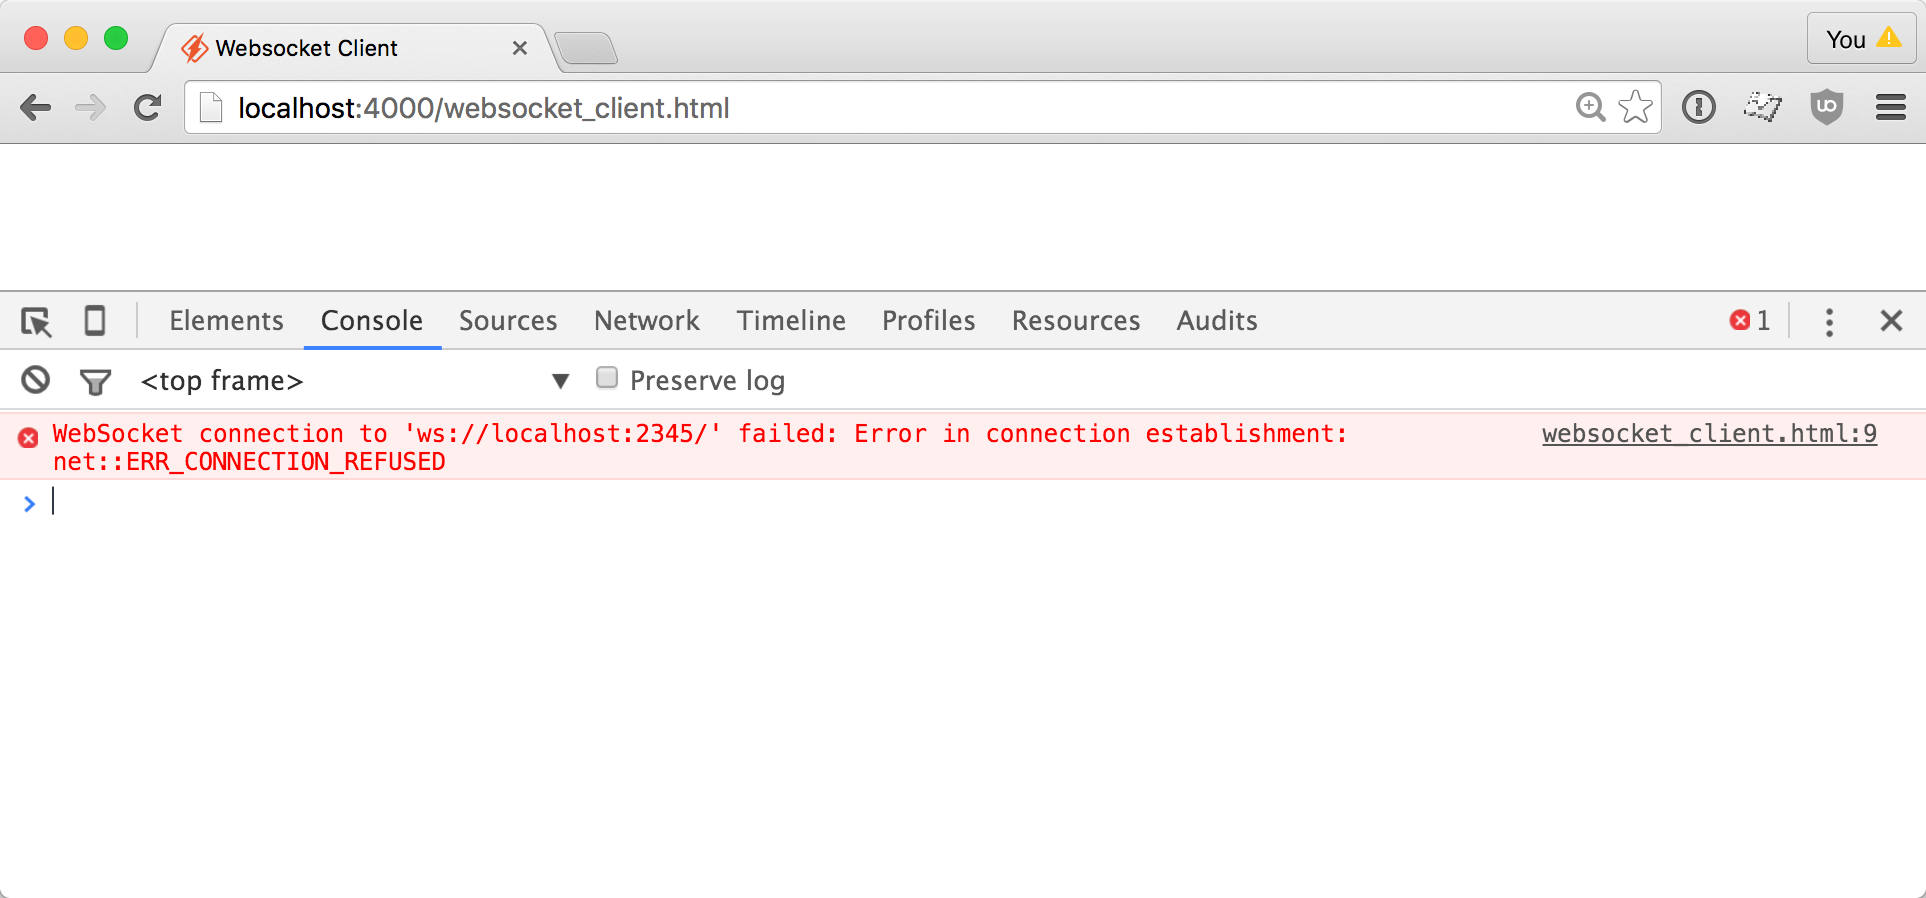
If I start up a little static server and open this file in my web browser, I get an error. That makes sense, because there is no server yet. We still have to build one. :-)
Beginning the server
Web socket start out life as normal HTTP requests. They have kind of an odd lifecycle:
- The browser sends a normal HTTP request, with some special headers that say "please make me a websocket."
- The server replies with a certain HTTP response, but DOESN'T CLOSE THE CONNECTION.
- The browser and server then use a special websocket protocol to exchange frames of data over the open connection.
So the first step for us is to build a Web server. In the code below, I'm creating the simplest possible web server. It doesn't actually serve anything. It simply waits for a request then prints it to STDERR.
require 'socket'

server = TCPServer.new('localhost', 2345)

loop do

  # Wait for a connection
  socket = server.accept
  STDERR.puts "Incoming Request"

  # Read the HTTP request. We know it's finished when we see a line with nothing but \r\n
  http_request = ""
  while (line = socket.gets) && (line != "\r\n")
    http_request += line
  end
  STDERR.puts http_request
  socket.close
end
If I run the server, and refresh my websocket testing page, I get this:
$ ruby server1.rb
Incoming Request
GET / HTTP/1.1
Host: localhost:2345
Connection: Upgrade
Upgrade: websocket
Sec-WebSocket-Version: 13
Sec-WebSocket-Key: cG8zEwcrcLnEftn2qohdKQ==
If you'll notice, this HTTP request has a bunch of headers that related to Web sockets. This is actually the first step in the websocket handshake
The handshake
All Web socket requests start out with a handshake. This is to make sure that both the client and the server both understand that Web sockets are about to happen and they both agree on the protocol version. It works like this:
Client sends a HTTP request like this
GET / HTTP/1.1
Host: localhost:2345
Upgrade: websocket
Connection: Upgrade
Sec-WebSocket-Key: E4i4gDQc1XTIQcQxvf+ODA==
Sec-WebSocket-Version: 13
The most important part of this request is the Sec-WebSocket-Key. The client expects the server to return a modified version of this value as proof against XSS attacks and caching proxies.
Server responds
HTTP/1.1 101 Switching Protocols
Upgrade: websocket
Connection: Upgrade
Sec-WebSocket-Accept: d9WHst60HtB4IvjOVevrexl0oLA=
The server response is boilerplate except for the Sec-WebSocket-Accept header. This header is generated like so:
# Take the value provided by the client, append a magic
# string to it. Generate the SHA1 hash, then base64 encode it.
Digest::SHA1.base64digest([sec_websocket_accept, "258EAFA5-E914-47DA-95CA-C5AB0DC85B11"].join)
Your eyes are not lying to you. There is a magic constant involved.
Implementing the handshake
Let's update our server to complete the handshake. First, we'll pull the security token out of the request headers:
# Grab the security key from the headers.
# If one isn't present, close the connection.
if matches = http_request.match(/^Sec-WebSocket-Key: (\S+)/)
  websocket_key = matches[1]
  STDERR.puts "Websocket handshake detected with key: #{ websocket_key }"
else
  STDERR.puts "Aborting non-websocket connection"
  socket.close
  next
end
Now, we use the security key to generate a valid response:
response_key = Digest::SHA1.base64digest([websocket_key, "258EAFA5-E914-47DA-95CA-C5AB0DC85B11"].join)
STDERR.puts "Responding to handshake with key: #{ response_key }"

socket.write <<-eos
HTTP/1.1 101 Switching Protocols
Upgrade: websocket
Connection: Upgrade
Sec-WebSocket-Accept: #{ response_key }

eos

STDERR.puts "Handshake completed."
When I refresh the websocket test page, I see now that there's no longer a connection error. The connection was established!
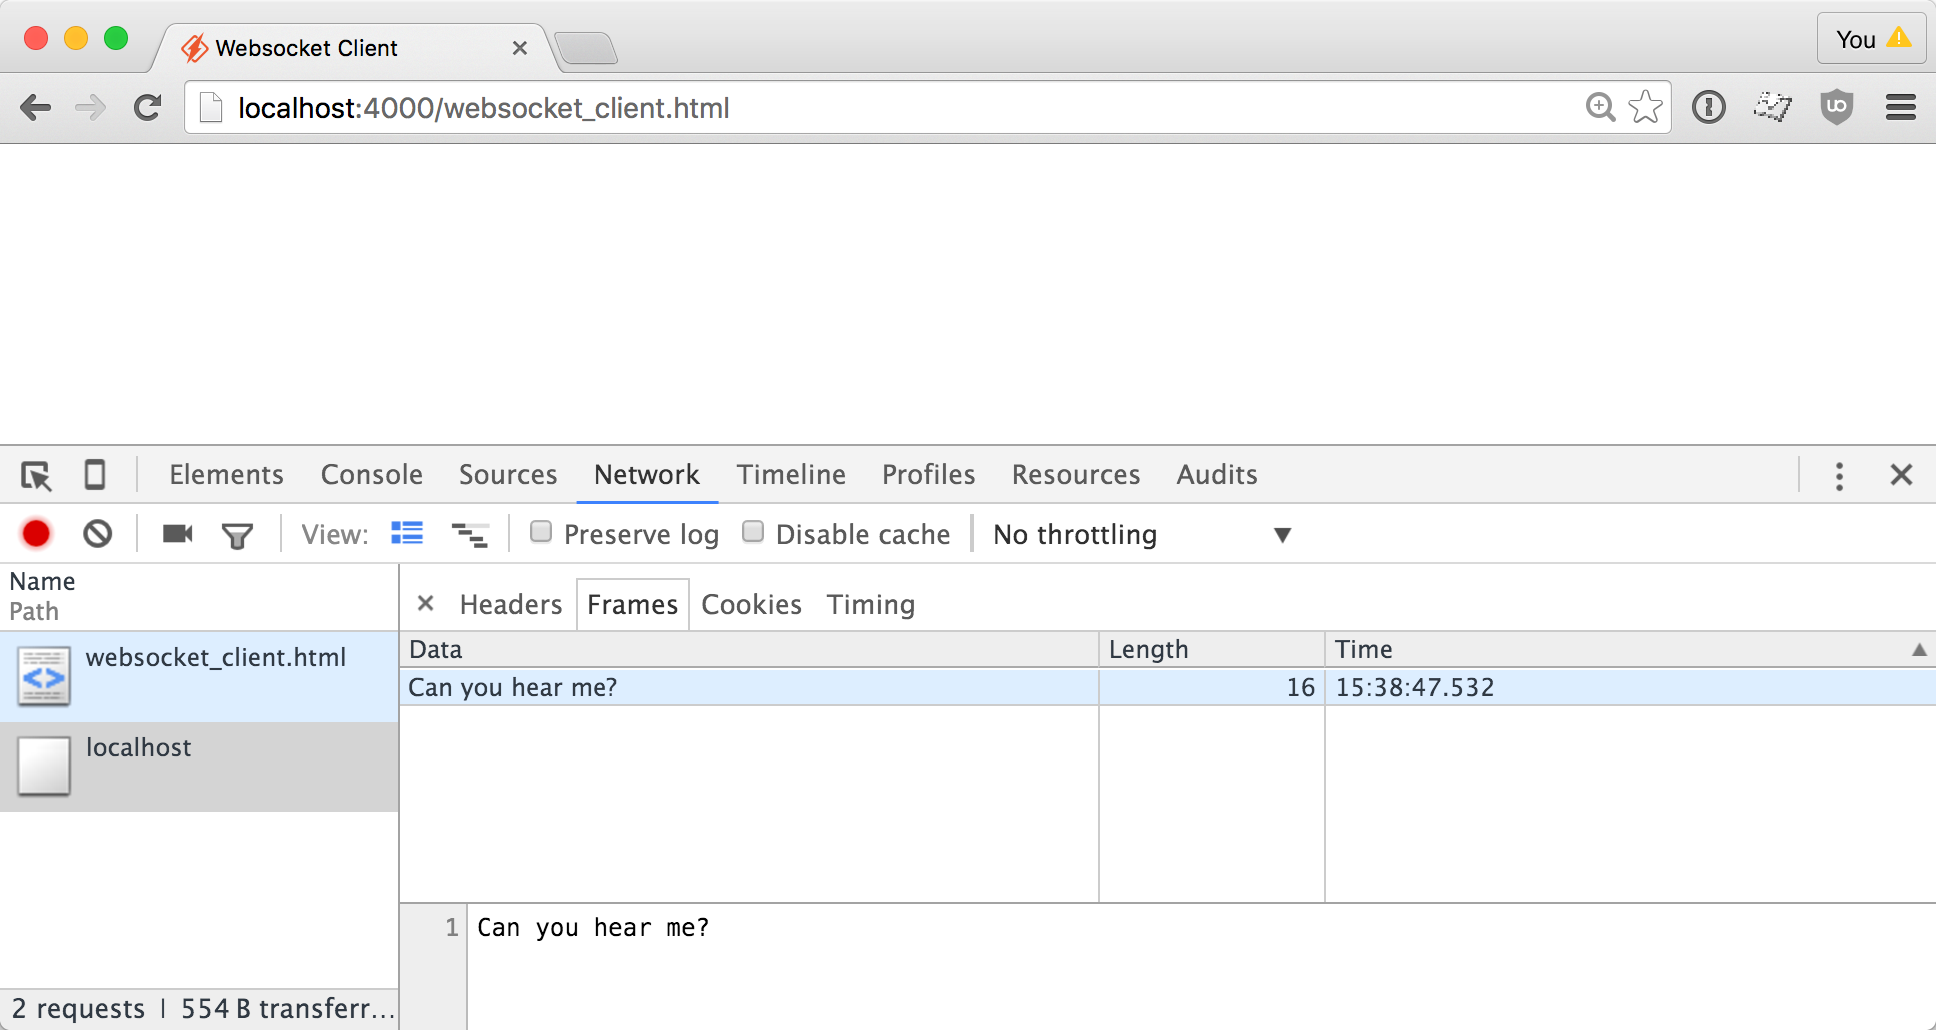
Here's the output from the server, showing the security keys and the response key:
$ ruby server2.rb
Incoming Request
Websocket handshake detected with key: Fh06+WnoTQQiVnX5saeYMg==
Responding to handshake with key: nJg1c2upAHixOmXz7kV2bJ2g/YQ=
Handshake completed.
The websocket frame protocol
Once a WebSocket connection is established, HTTP is no longer used. Instead, data is exchanged via the WebSocket protocol.
Frames are the basic unit of the WebSocket protocol.
The WebSocket protocol is frame-based. But what does this mean?
Whenever you ask your web browser to send data over WebSocket, or ask your server to respond, the data is broken up into a series of chunks in each of those chunks is wrapped in some metadata to make a frame.
Here's what the frame structure looks like. The numbers along the top are bits. And some of the fields, like extended payload length may not always be present:
0 1 2 3 4 5 6 7 8 9 0 1 2 3 4 5 6 7 8 9 0 1 2 3 4 5 6 7 8 9 0 1
+-+-+-+-+-------+-+-------------+-------------------------------+
|F|R|R|R| opcode|M| Payload len |    Extended payload length    |
|I|S|S|S|  (4)  |A|     (7)     |             (16/64)           |
|N|V|V|V|       |S|             |   (if payload len==126/127)   |
| |1|2|3|       |K|             |                               |
+-+-+-+-+-------+-+-------------+ - - - - - - - - - - - - - - - +
|     Extended payload length continued, if payload len == 127  |
+ - - - - - - - - - - - - - - - +-------------------------------+
|                               |Masking-key, if MASK set to 1  |
+-------------------------------+-------------------------------+
| Masking-key (continued)       |          Payload Data         |
+-------------------------------- - - - - - - - - - - - - - - - +
:                     Payload Data continued ...                :
+ - - - - - - - - - - - - - - - - - - - - - - - - - - - - - - - +
|                     Payload Data continued ...                |
+---------------------------------------------------------------+
The first thing that may jump out at you is that this is a binary protocol. We're going to have to do some bit manipulation, but don't worry — it won't be that hard. The numbers along the top of the figure are bits. And some of the fields may not always be present. For example the extended payload length will be present if the payload is under 127 bytes.
Receiving data
Now their handshake is complete, we can start parsing the binary frame. To keep things simple, we're going to look at the incoming frame one byte at a time. After that, we'll put it all together so you can see it in action.
Byte 1: FIN and Opcode
From the table above, you can see that the first byte (the first eight bits) contains a few pieces of data:
- FIN: 1 bit If this is false, then the message is split into multiple frames
- opcode: 4 bits Tells us if the payload is text, binary, or if this is just a "ping" to keep the connection alive.
- RSV: 3 bits These are unused in the current WebSockets spec.
To get the first byte, we'll use the IO#getbyte method. And to extract the data, we'll use some simple bitmasking. If you're not familiar with bitwise operators, check out my other article Bitwise hacks in Ruby
first_byte = socket.getbyte
fin = first_byte & 0b10000000
opcode = first_byte & 0b00001111

# Our server will only support single-frame, text messages.
# Raise an exception if the client tries to send anything else.
raise "We don't support continuations" unless fin
raise "We only support opcode 1" unless opcode == 1
Byte 2: MASK and payload length
The second byte of the frame contains more information about the payload.
- MASK: 1 bit Boolean flag indicating if the payload is masked. If it's true, then the payload will have to be "unmasked" before use. This should ALWAYS be true for frames coming in from our client. The spec says so.
- payload length: 7 bits If our payload is less than 126 bytes, the length is stored here. If this value is greater than 126, that means more bytes will follow to give us the length.
Here's how we handle the second byte:
second_byte = socket.getbyte
is_masked = second_byte & 0b10000000
payload_size = second_byte & 0b01111111

raise "All frames sent to a server should be masked according to the websocket spec" unless is_masked
raise "We only support payloads < 126 bytes in length" unless payload_size < 126

STDERR.puts "Payload size: #{ payload_size } bytes"
Bytes 3-7: The masking key
We expect that the payloads of all incoming frames will be masked. To unmask the content, we will have to XOR it against a masking key.
This masking key makes up the next four bytes. We don't have to process it at all, we just read the bytes into an array.
mask = 4.times.map { socket.getbyte }
STDERR.puts "Got mask: #{ mask.inspect }"
Please tell me if you know of a nicer way to read 4 bytes into an array. The
times.mapis a little strange, but it was the most concise approach I could think of. I'm @StarrHorne on twitter.
Bytes 8 and up: The payload
Okay, we're done with metadata. Now can fetch the actual payload.
data = payload_size.times.map { socket.getbyte }
STDERR.puts "Got masked data: #{ data.inspect }"
Remember that this payload is masked. So if you print it out, it will look like garbage. To unmask it, we simply XOR each byte with the corresponding byte of the mask. Since the mask is only four bytes long, we repeat it to match the length of the payload:
unmasked_data = data.each_with_index.map { |byte, i| byte ^ mask[i % 4] }
STDERR.puts "Unmasked the data: #{ unmasked_data.inspect }"
Now we have an array of bytes. We need to convert that into a unicode string. All text in Websockets is unicode.
STDERR.puts "Converted to a string: #{ unmasked_data.pack('C*').force_encoding('utf-8').inspect }"
Putting it all together
When you put all of this code together, you get a script that looks like this:
require 'socket' # Provides TCPServer and TCPSocket classes
require 'digest/sha1'

server = TCPServer.new('localhost', 2345)

loop do

  # Wait for a connection
  socket = server.accept
  STDERR.puts "Incoming Request"

  # Read the HTTP request. We know it's finished when we see a line with nothing but \r\n
  http_request = ""
  while (line = socket.gets) && (line != "\r\n")
    http_request += line
  end

  # Grab the security key from the headers. If one isn't present, close the connection.
  if matches = http_request.match(/^Sec-WebSocket-Key: (\S+)/)
    websocket_key = matches[1]
    STDERR.puts "Websocket handshake detected with key: #{ websocket_key }"
  else
    STDERR.puts "Aborting non-websocket connection"
    socket.close
    next
  end


  response_key = Digest::SHA1.base64digest([websocket_key, "258EAFA5-E914-47DA-95CA-C5AB0DC85B11"].join)
  STDERR.puts "Responding to handshake with key: #{ response_key }"

  socket.write <<-eos
HTTP/1.1 101 Switching Protocols
Upgrade: websocket
Connection: Upgrade
Sec-WebSocket-Accept: #{ response_key }

  eos

  STDERR.puts "Handshake completed. Starting to parse the websocket frame."

  first_byte = socket.getbyte
  fin = first_byte & 0b10000000
  opcode = first_byte & 0b00001111

  raise "We don't support continuations" unless fin
  raise "We only support opcode 1" unless opcode == 1

  second_byte = socket.getbyte
  is_masked = second_byte & 0b10000000
  payload_size = second_byte & 0b01111111

  raise "All incoming frames should be masked according to the websocket spec" unless is_masked
  raise "We only support payloads < 126 bytes in length" unless payload_size < 126

  STDERR.puts "Payload size: #{ payload_size } bytes"

  mask = 4.times.map { socket.getbyte }
  STDERR.puts "Got mask: #{ mask.inspect }"

  data = payload_size.times.map { socket.getbyte }
  STDERR.puts "Got masked data: #{ data.inspect }"

  unmasked_data = data.each_with_index.map { |byte, i| byte ^ mask[i % 4] }
  STDERR.puts "Unmasked the data: #{ unmasked_data.inspect }"

  STDERR.puts "Converted to a string: #{ unmasked_data.pack('C*').force_encoding('utf-8').inspect }"

  socket.close
end
When I refresh my WebSocket tester webpage and it makes a request to my server, here's the output that I see:
$ ruby websocket_server.rb
Incoming Request
Websocket handshake detected with key: E4i4gDQc1XTIQcQxvf+ODA==
Responding to handshake with key: d9WHst60HtB4IvjOVevrexl0oLA=
Handshake completed. Starting to parse the websocket frame.
Payload size: 16 bytes
Got mask: [80, 191, 161, 254]
Got masked data: [19, 222, 207, 222, 41, 208, 212, 222, 56, 218, 192, 140, 112, 210, 196, 193]
Unmasked the data: [67, 97, 110, 32, 121, 111, 117, 32, 104, 101, 97, 114, 32, 109, 101, 63]
Converted to a string: "Can you hear me?"
Sending data back to the client
So we've successfully sent a test message from our client to our toy WebSocket server. Now it would be cool to send a message back from the server to the client.
This is a little less involved, as we don't have to deal with any of the masking stuff. Frames sent from server to client are always unmasked.
Just like we consumed the frame one byte at a time, we're going to construct it one byte at a time.
Byte 1: FIN and opcode
Our payload is going to fit into one frame, and it's going to be text. That means that FIN will equal 1, and the opcode also equals one. When I combine those using the same bit format that we used before, I get a number:
output = [0b10000001]
Byte 2: MASKED and payload length
Because this frame is going from the server to the client, MASKED will equal zero. That means that we can ignore it. The payload length is just the length of the string.
output = [0b10000001, response.size]
Bytes 3 and up: The payload
The payload is not masked, it's just a string.
response = "Loud and clear!"
STDERR.puts "Sending response: #{ response.inspect }"

output = [0b10000001, response.size, response]
Bombs away!
At this point, we have an array containing the data that we want to send. We need to convert this to a string of bytes which we can send over the wire. To do this we will use the super-versatile Array#pack method.
socket.write output.pack("CCA#{ response.size }")
That strange string "CCA#{ response.size }" tells Array#pack that the array contains two 8-bit unsigned ints, followed by a character string of the specified size.
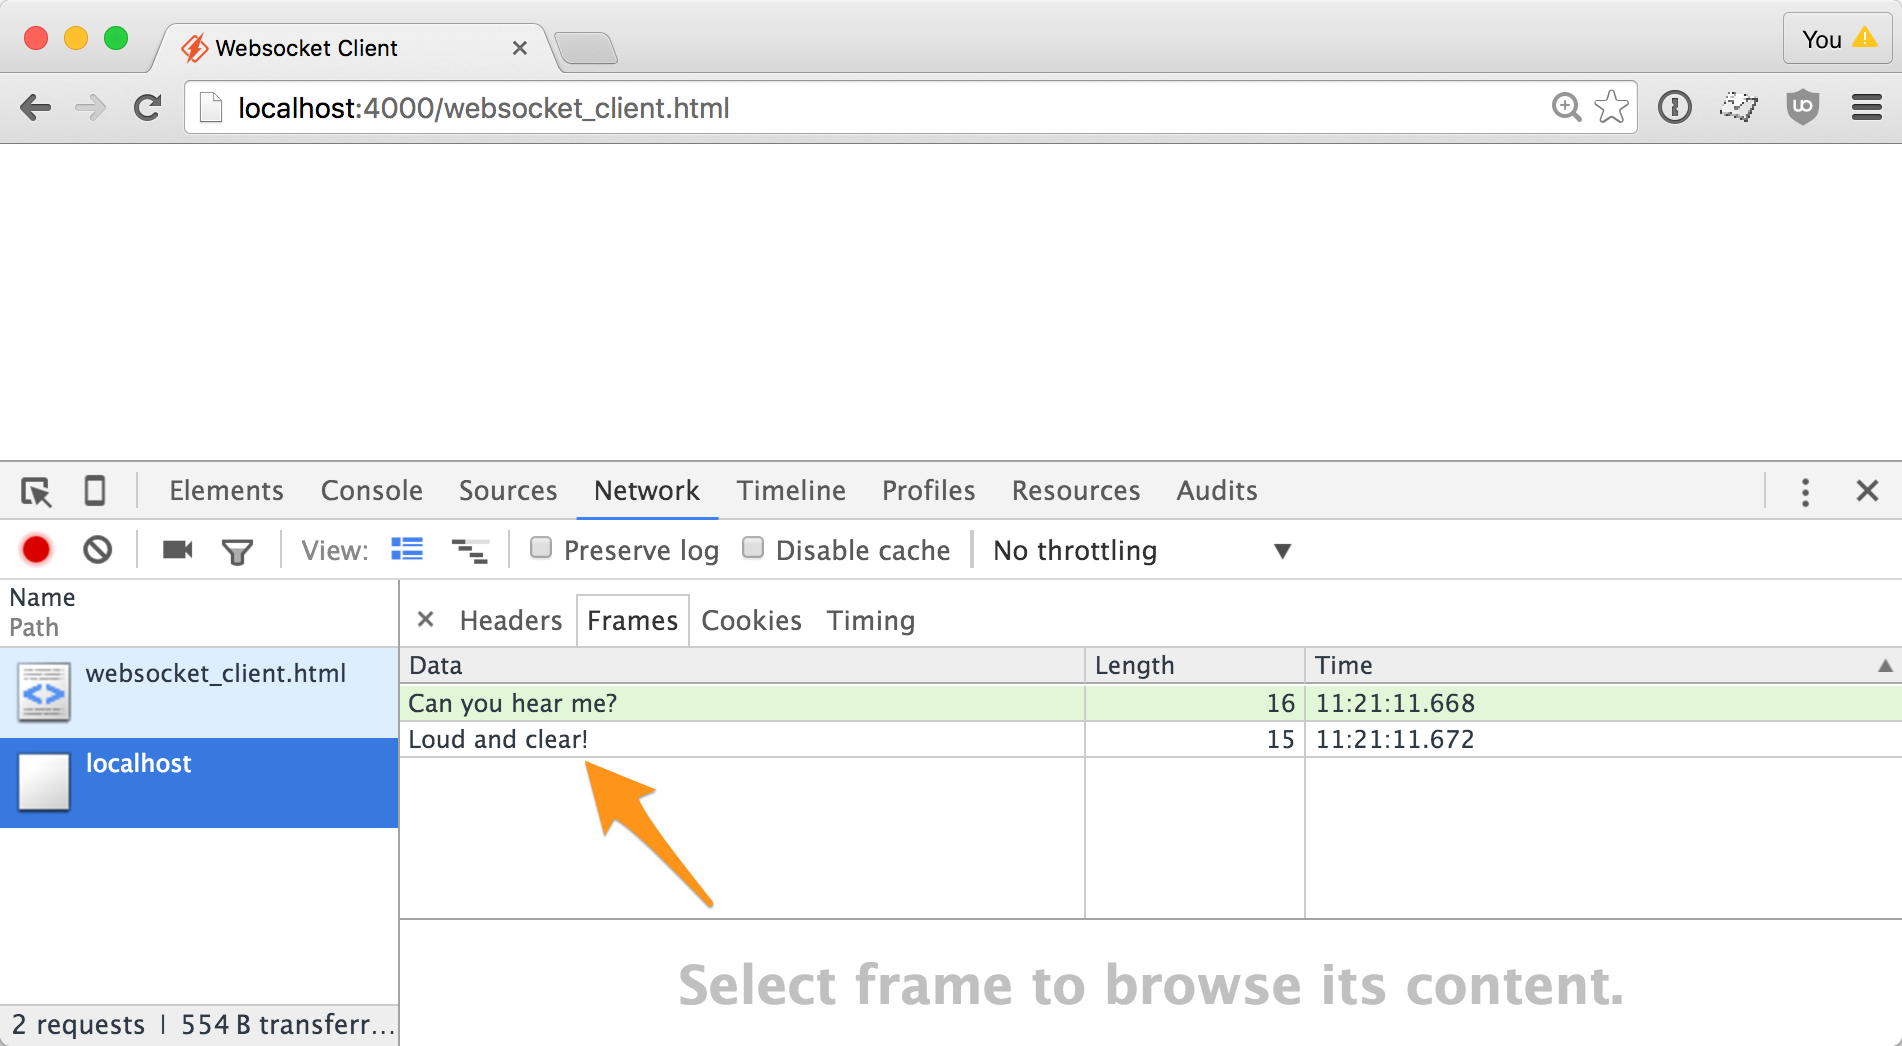
If I open up the network inspector in chrome, I can see the message came through loud and clear.
Extra Credit
That's it! I hope you've learned something about WebSockets. There are a lot of things the server is missing. If you want to continue to exercise, you might look in them:
- Support for multi-frame payloads
- Binary payload support
- Ping / Pong support
- Long payload support
- Closing handshake


 Molly Struve, Sr. Site Reliability Engineer, Netflix
 Chris Patton, Founder of Punchpass.com
